Sunday, 26 March 2023

A terrible memory or a fundamental failure to understand?

Juno's Grooved 6 Board Burr number 7
I’ve had a week of annual leave up in Bonny Scotland relaxing and eating far too much good food! (I can heartily recommend Dine at the Traverse  as a fabulous place to eat - afterwards I was only good for a sleep). Of course there was also the customary visit to the outlaws and even a Mother's Day afternoon tea at The Ivy (again, I was only good for a sleep afterwards!) Luckily, I brought a few puzzles to play with and even managed (with a struggle) to solve one… partially at least!
 
Yay! 6 more!
This week I am showing off the seventh in the series of Grooved Board Burrs by Junichi Yananose. Seven? OMG! But how could I resist? I have the other 6 and absolutely adored them. I have reviewed most of them (#1, #2, #3, #4, #6) over the years as they came out. Number 7 in the series was released a couple of weeks ago and is still available now. Juno himself (he’s a genius) said that the difficulty is extremely high and suggested using the photos on the site to aid with small hints during the search for the solution path.

The first thing I noticed when I unwrapped my lovely parcel was how vibrantly beautiful the puzzle is. As before the puzzle is made using Juno's home made Plywood (this provides strength and prevents warping as humidity conditions change). The wood used are PNG Rosewood and Red Gum which contrast with each other beautifully. This one is slightly larger than the first 6 and is less bevelled to try and prevent inadvertent rotational moves. The immediately obvious difference, however, is that this puzzle has considerably more complex pieces with pins on the external surfaces of the puzzle. These are also there to prevent rotational moves.

Juno wrote in his description:
"The puzzle has a unique solution in a relatively small number of 91 assemblies, and the computer program Burr Tools showed its level to be, 50-18-3-3, the highest number in the Grooved 6 Board Burr series. In the real world, the interlocking of the consisting pieces becomes unstable after around 40 moves from the assembled shape, and it allows a rotational movement shortcut that is theoretically possible. It is yet the largest number ever in the series to release the first piece from the assembled shape."
The pathway is relatively constrained initially but very quickly it becomes apparent that there is quite a lot of movement possible with many choices for what to move and at various points the puzzle gets stretched apart a very long way and still remains stable. Those external dowels/pins really do work to prevent rotations. I managed a good few moves with my usual to and fro approach backtracking to the beginning each time. Then I got stuck for a couple of days. I couldn’t spend too much time on it - we were on holiday and had stuff to do. 

After a bit of a hiatus at one position and wondering whether I had completely mistaken the correct path, I found a spectacular new move which opened up a whole new set of paths but, as is usual I backtracked to the beginning and, yes, as you’d expect I couldn't find the move to get to that place again. I’m an eejit! I spent several hours searching around the same spot desperately trying to find the single crucial move.

The difference was small… I needed to move from this position:

See how stretched out it is?
To this position:

That front board has shifted from one notch to another
This looks trivial to achieve yet it took me 2 days of swearing under my breath! The crucial factor in finding the path was the realisation that the placement of the pegs on the outside forces the puzzle to use ⅓ voxel moves! This is the reason for the title of the blog post - I thought I had just been a victim of a terrible memory but in reality, I had completely misunderstood the complexity of the puzzle. This means that instead of a 6x6x6 grid (with each board being 1x4x6 voxels), a much larger grid was needed. The whole thing would need to be tripled in size!

After that hideous/revealing discovery, it opened up again to a huge new vista of complexity and some seriously scary sequences. The puzzle did begin to become rotationally unstable but unallowed moves were always prevented from being completed by the pins. My to and fro technique worked for quite some time but eventually I got lost. I found myself going around and around in a loop unable to go forward or back until I found my way back to the beginning by accident. Phew!

At this point I stopped for a day to try and regain my nerves! These puzzles are great fun but I’m always frightened with some that I will get stuck in a position and not be able to go forward or back ever again. I have a couple of incredibly complex burrs that are stuck in an odd hedgehog-like shape and I cannot do anything about it - they’ve been stuck like that for years! I did get my courage back, however, as I figured that a 6 piece burr really should not get irrevocably stuck. Once I returned back to the second half of the solution, I systematically tried different sequences until I had my Aha! moment. My first piece came out.

I have to say that Juno's hint pictures were not in any way useful! Each one was taken with a different orientation of the puzzle making it impossible to relate one position to a later one. I tried turning my puzzle at various stages to match the photo but quickly lost any idea of what position I was in whilst rotating it about. 

In removing the first piece, I had to reach to a table to put it down and my grip on the puzzle shifted and the remaining pieces revealed themselves to be very unstable. A bunch of pieces rotated and dropped down. I had no idea how they should have been placed and it was easy to remove a pair in one go from this new position. After that, I took it apart completely for my photo.

Seriously complex pieces!
I would love to tell you that I have managed to reassemble it but there is not a hope in hell of that without Burrtools! I think even the amazing Rich (frequent MPP visitor, who is an incredible burr assembler) might struggle to assemble this from scratch.

I will need to wait until I get home to my computer (this post was done on an iPad) to program it in. It’s going to be a real challenge to enter it as I don’t actually have pictures showing where all the external grooves and pins should be on the assembled puzzle. But, trying to make my BT files is part of the puzzle fun for me. It might take several hours! Oh joy!

This fabulous challenge is still available from Juno now - go buy one before they sell out. It is seriously seriously good.
Thank you, my friend!


Sunday, 19 March 2023

A Second View Through The Window

Dick Hensel's Window Lock 2
Imagine my utter horror to be wearing the same dress to the party sorry, publishing a review of the same puzzle as good friend and much better puzzler, Allard! His post on this puzzle is much better than mine - go read it now!

I now have 3 Locks from Dick and every single one of them is Shane's fault. He keeps getting early copies (he’s a locksmith, after all) and showing them off on Facebook which, of course, tempts me into rattling off another email and once more, rattling off some PayPal. Luckily I took delivery of this whilst Mrs S was away at the outlaws. By the time she came back I had it secreted away amongst all the others. To all you men out there, you know the answer you get to the question "is that new?" (Shoes, clothes, handbags, jewellery etc.) and the answer is "oh no, I’ve had this for ages". This can apply just as equally to puzzles. When asked about whatever I’m fiddling with, I can reply: "I’ve had this one ages!" And luckily, to Mrs S they all look the same! This means I can sneak them in whilst she is away and she will never know…apart from the Ring door camera which does give things away a bit. Doh!

The middle puzzle lock in the group is the Hensel lock mark III and was the first I bought from him and even after nearly 6 years, remains unsolved. I have had it on my desk for years and can only find a few moves. I’m a puzzle lock eejit! I really enjoyed the first Window Lock - both of these are a mixture of a dexterity puzzle, a maze, as well as very constrained sequential discovery puzzle. The fact that it looks like a lock is entirely incidental.

They all look very similar in shape and size and I think this version is made from oak. It has 2 ball bearings inside and a rather complex maze of pieces which form a bewildering set of baffles. Some of them clearly block the opening of the shackle and others seem to be there for no good reason. But… everything is there for a specific purpose. The initial fiddle with the shackle shows it to be blocked by the large ball bearing so it’s time to try and move it out of the way. Easier said than done! It’s a bit of a bugger manipulating everything with just the small ball bearing as your solitary tool. Through the window you can see everything but not really knowing what to do, you end up trying a few things u til miraculously you discover some parts are held together by a magnet and you need to break them apart with nothing apart from a ball bearing. Having found the first sequence, I realised that that there was another piece holding the shackle in the locked position. Time to move the ball elsewhere and try to release it. Again, easier said than done. Trying to move the ball without losing the gain already made is a challenge in its own right and then trying to undo the path blockage you have made getting there is a fun diversion. 

I finally moved to the second challenge an unblocked the restriction only to find the shackle still had a third element locking it in place. Right then, off we go and release that. Erm…except I couldn’t! It would appear that I had done it in the incorrect order! Damn! Who would have thought that a lock needed a specific sequence of moves to open it? Not me obviously but then, as previously stated, I’m an eejit. I had to relocate the element I’d already done and move to the required position to start again. After that, time to backtrack and redo my mistaken second move. Aha! The lock opened and I was startled to see the way it actually opened. 

No clues here!
Re-examining the sheer amount of difficult moves that Dick had put into this design and the precision required to make the tiny pieces that move on each other, held by tiny magnets, I am staggered at how well it works. Re-locking the puzzle is "just" a matter of reversing the steps but because gravity and pushing/pulling against magnets is so important, this I actually NOT quite so straightforward. Slightly different pathways/moves are required and for one move in particular, quite a lot of dexterity.

I have solved this a few times over the last week and still enjoy the process. I know exactly what to do in what order but actually doing it remains a bit of a dexterity nightmare. I love it! If you can find a copy of this then it’s well worth it.

Now, who wants to help me "launder" more puzzle deliveries so Mrs S doesn’t find out about them? 
😈😈😈

Sunday, 12 March 2023

An Edge Turner That Is Not Intuitive

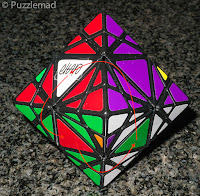
Eitan's Edge Turning Octahedron
I am working again (4th weekend in a row) and have produced this post in a bit of a hurry in advance. If there are any errors then please let me know.

Eitan Cher has been responsible for a lot of fun in the PuzzleMad HQ and also a LOT of angst! He has designed quite a few of my very favourite as well as the most difficult of my puzzles. Despite all the angst, I absolutely adore what he creates. The Edge Turning Octahedron (ETO) was purchased quite some time ago in the expectation of fun and very quickly shelved when I discovered that it most likely would cause angst! In general the edge turning twisty puzzles can be mostly solved with a lot of intuition and only needing one or two fairly easy to find algorithms for the very end of the solution. Overall, they have been some of my most favourite of twisties for this reason:

Edge turning cubes
Why did I shelve it so quickly? One of the features of edge turners is the fact that they jumble: that is, it is possible to perform partial turns to line up intermediate cuts and then continue turning other edges which removes pieces from their normal "orbits" and also can make pieces shapeshift wildly. This is one of the reasons that I recommend them in my "advice for a beginner" post. However, with the ETO it scared the pants off me:
 
Just one jumble!!
It was quite clear that this was going to be bloody difficult - probably too tough for a relatively poor twisty puzzler like me. Eventually, I was convinced by a number of puzzlers to give it a go and I decided to try a non-jumbling scramble first. I really hoped that it would behave like other edge turners and mostly solve by intuition. Off we go:

Oh Lord! What have I done?

Corners all sorted to ensure no parity
Attempting a single face
So far, with almost all the edge turning puzzles, I have tried and succeeded in solving almost all of it by starting at one face and working my way up the puzzle almost layer by layer until I have reached the top. Occasionally I have had to intuitively build partial components and then move them up rather than single piece at a time and then find out how to complete the endgame. Straight away with the ETO, I struggled. It is almost impossible to build even a single face by intuition without destroying previously positioned pieces. Above, was about as far as I could get and I feared for the worst. 

I thought this was going to go back on my shelf scrambled but I was fortunate enough to have a massive explosion when I tried to make a turn without fully aligning edges properly. I then had a good reason to completely dismantle it and reassemble unscrambled and seek alternative methods. I really should have done my "due diligence" first - but then I am well known for not being terribly bright!

What most decent twisty puzzlers do when they have a new puzzle is explore it before they scramble it and try and learn what different known sequences will do. Since this was an edge turner, I felt confident that intuition would be useful and did not bother with that crucial early exploration phase. Having reassembled it, I could try again and do it properly.

The first thing I often do is sequences of turns around a face or corner and see what happens after 2,3,4,...x turns and if nothing seems to be useful then I can very easily backtrack.

I very quickly found this lovely sequence which certainly looked like it might be useful - turning the blue/white edge and the purple/white edge sequentially three times cause 2 adjacent centre flat triangle swaps with the adjacent edge wings. This might be useful.

Next, I try the "edge piece series" and the "corner piece series" which are so crucial if using the "Ultimate solution" to the Rubik cube which Rline has shown off so beautifully on his Twisty Puzzling channel. The Edge piece series wasn't terribly helpful for me but a corner piece series (modified for edge turning) proved very useful.

As you can see - the end result of the simple 8 move CPS is to 3 cycle the centres (plus muck up some edge wings, but with no effect on the corners and centre flat triangles. This tells me that if I can find a way to solve the corners and flat triangles first and edge wings last then I have an approach to the solution.

3 cycle these composite corners takes 4 moves
Do the same F to B then undo
Next thing I did was look for any easy commutators. This was not terribly difficult - it is easy to perform a 4 move sequence of R, L, R, L to swap composite corners as done above left. If I can isolate one of those edge wings in the top and then undo it all then I have a commutator. Luckily isolating that edge wing is very similar (I just perform a F, B, F sequence and then I can undo the original sequence. The end result is to create a 3 cycle of edge wings. I'm getting closer. I can place and orient corners by intuition, I can place the centres and the edge wings. I now only have to find a way to move the flat centre triangles (either alone or with other pieces) and then I have my whole approach sorted. This takes me quite a while.


After a lot of fiddling around and desperately trying not to forget what I moves I have made so that I can always undo them, I discover a very similar sequence to the edge wing commutator. If I turn the front edge and then follow this with a R, L, R and then undo it all, I have another commutator. This time it is not pure - as you can see to the left, I have moved centres and flat centre triangles with an adjacent edge wing in a 3-cycle.


This gives me my whole puzzle solution:
  1. Solve the corners
  2. Solve the flat centre triangles (the sequence moves everything apart from corners)
  3. Solve the centres (the sequence doesn't upset corners or flat triangles)
  4. Solve the edge wings (the sequence doesn't upset anything else)
Is it quite as easy as that? Erm... not really! Placing the corners is very simple except that there are lots of positions that places them in positions that the flat triangles cannot reach - they are in orbits as one would expect of an edge turning puzzle. It is ESSENTIAL to get those corners right first and seems to take me quite a while to get it right. I found a parity where 2 pairs of centre flat triangles need to be flipped. This cannot be done with the 3-cycles but luckily I had found my simple technique as the first thing I had found. All that was needed was to 3 cycle the pairs so that the were either side of a single centre. The centre positioning is pretty simple and then the edge wings are just plain arduous - as you work your way through, you need more and more complex setup moves to ensure the pieces I wanted to move are in the correct positions. Eventually the setup moves are so complex that I have to write them down before I perform the algorithm otherwise I will forget what I have done and then be unable to undo it. 

In the end - I have my solved Edge turning octahedron and a huge sense of relief! I have to say that yet again Eitan has created a most fabulous puzzle and any serious twisty puzzler should buy a copy. It is not an easy puzzle (certainly no intuitive like most edge turners) but definitely solvable with a bit of experimentation. I really need to add another chapter to my advice to a beginner series to include a few of the puzzles produced since my original post. I may need some help with that if anyone wants to help me. Now I need to get the courage to try a jumbled scramble and solve. I suspect it will take me some time to get the courage together for that!!!


Sunday, 5 March 2023

Pac'ing Almost by Accident

4 PAC by Hajime Katsumoto
This one was Allard's fault! He organised an MPP and I saw the puzzle there and after a very quick fiddle decided I HAD to have one. Mrs S is gunning for Allard for causing yet another toy to arrive in Sheffield. As I wrote last week, I had seen this one receive a prize in the 2021 IPP design competition and forgotten about it until that MPP and then chatting with Tom Lensch (who had made it) and ended up buying several wooden delights. 

It is quite a chunky puzzle compared to Katsumoto-san's previous delights - these include the amazing Penta in a box and Slide packing puzzles which I reviewed here back in 2016 or the 5L Box reviewed here in 2020. Tom's lovely sturdy construction has a box with dimensions 10.4x7.4x7.0cm with the 4 Pacmen all being 6cm diameter and 3cm thick. The aim, clearly is to insert all 4 of the Pacmen into the box through a hole that is just the size to allow a single one through at a time. There are a bunch of hokes in the top, bottom and sides to allow finger poking and manipulation of the pieces. It looks pretty simple really - I could not immediately see what all the fuss had been about but knew that to achieve the accolade and reviews that it had, there must be something special to it. 

Having established early that this was not as simple as it looked, I moved onto the other arrivals so as to have something for the blog. I was relatively horrified when other puzzlers mentioned that they were significantly struggling with it. I finally got a chance to play properly and started (as I am sure that everyone does) looking for ways that the Pacmen could interlink to allow them to fill a 2x2x3 unit space before trying to find ways to get them in to said space through a small hole. It transpires that there are a few very nice pretty ways to arrange the pieces and they all looked problematic. I did wonder whether there would be enough space to make them spin on each other once inside the box and quickly found out that nope! this was not a possibility without cracking the acrylic lid.

This finding ruled out my first attempt at a solution but I had a couple of others up my sleeve and tried those one after another. This was fun until I realised that none of those solutions were achievable either. At one point, during an exhaustive search for a way to flip a pair of Pacmen, I did something that looked fabulous and then went nowhere. I then spent a good 30-45 minutes desperately trying to undo the move I had done - it was really quite tight and needed the piece arrangement just perfect to be possible. This frightened the crap out of me again and I determined not to try that again.

I was stuck - just as Allard had been stuck for a while. It is very straightforward to put 3 inside but after that there seems to be no movement possible. The placement of the last one is very obvious as soon as you begin to think© about it but leaving that space with the others seemed to be impossible. I spent another week in this position trying inside and outside the box.

I was so stuck that I took out another puzzle that has frightened me to death for a few months - Eitan's edge turning octahedron looks a fearsome puzzle and I had been too fearful to even investigate it but I needed to think about something else for a while and decided to try a few algorithms to clear my mind.

Having tried a few things on that like the edge piece series, a variant of the corner piece series and looked for a way to make a commutator. I decided it was time to go back to 4 PAC. As always, it just looked so simple. The pieces are cylinders with 90ΒΊ wedges cut out, the box is a 2x2x3 container - how hard can it be? I kept fiddling and even braved my previous awkward move and worked out how to go back and forth with it. 

I was sitting with Mrs S one evening watching TV and idly placing pieces inside whilst trying various moves but not really trying very hard or even paying a lot of attention - I think that Wednesday Adams was distracting me when I suddenly looked down and realised that I had a new arrangement of the pieces and if I just rotated the last one then I would have it solved. Mrs S was not terribly impressed when I showed her (she thought it looked remarkably easy!)

Like Allard, I had almost solved it my accident. I had them inside the box arranged in a way that had not occurred to me to try when looking outside the box. The sequence of moves is particularly clever and the solution really totally unexpected. The sense of achievement (even if I solved it accidentally) was fabulous. In reality, I would say that you cannot solve it randomly, you do need to try certain distinct moves but the final assembly will hit you with a surprise.

If you get a chance to play with a copy then it is very well worth your while. Thank you Hajime and Tom for a fabulous fun challenge.